If you are subscribed to MyTime’s Automated Marketing feature, you can create and send email campaigns to your entire client list, selected clients, or individual clients. This article explains how to send an email campaign to multiple clients.
Things to know:
- The ability to create and send email marketing campaigns is controlled by the "Accessing Email Campaigns" access control setting.
- By default, recipients must:
- Be associated with a location
- Have a valid email address on file
- Be opted in to receive marketing emails
- Clients who are not eligible (no email, not opted in, or not associated with a location) will not appear in the recipient list.
- Clients who are blocked from booking online will also not appear in the recipient list.
- For franchise businesses with client sharing enabled, the system ensures that the reply-to email and physical address used in a manual campaign always belong to a location within the sending child company. The system determines which specific location to use based on the following logic:
- Single Location Selection (Overrides All Rules): If a single location is manually selected during campaign setup, that location’s details are always used—regardless of the client’s preferred location or appointment history.
- Multi-Location or All-Location Campaigns: When a campaign targets multiple locations or all locations, the system selects a location for each client using the following order of priority:
- Client’s Preferred Location: Used only if it belongs to the child company sending the campaign. If the preferred location belongs to a different child company, it is ignored.
- Last Appointment Location: If there is no valid preferred location, the system uses the last location where the client had an appointment at that sending child company.
- First Associated Location: If the client has no appointment history at the sending child company, the system falls back to the client’s first associated location at that sending child company.
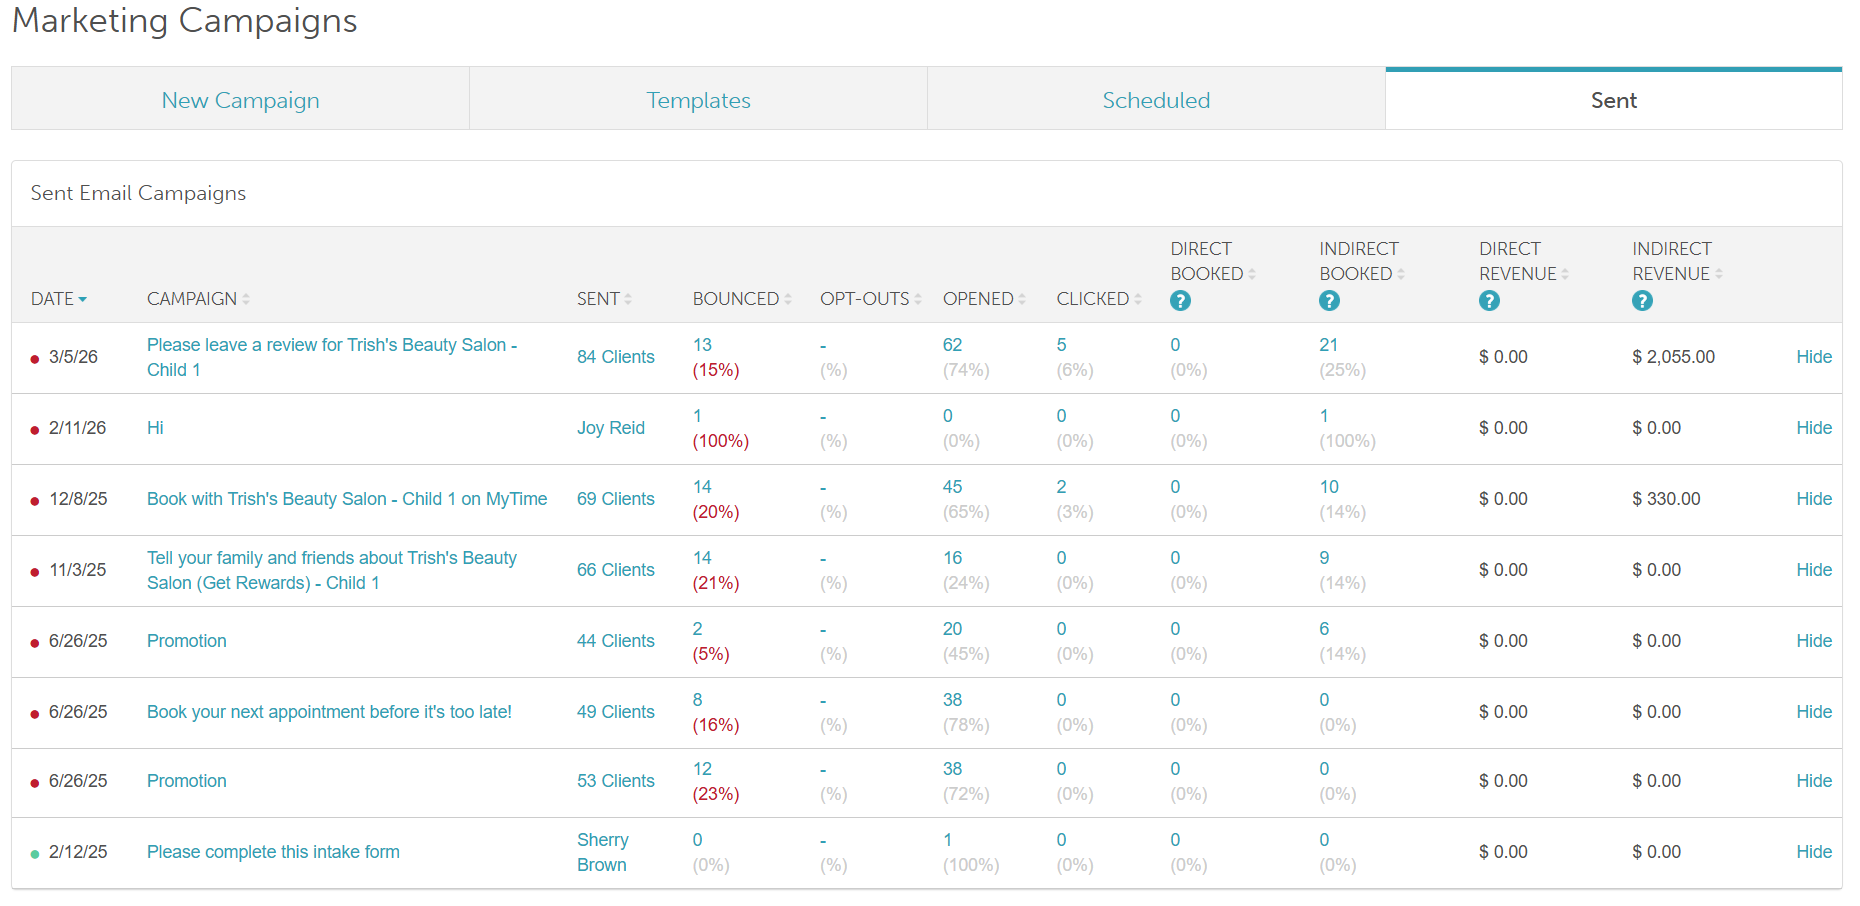
- Once a campaign is sent, MyTime tracks key metrics such as:
- Opens
- Clicks
- Bookings
- Bounced emails
- Clients may appear multiple times in the recipient list if multiple delivery methods are used, but are only counted once.
- Campaigns sent from client profiles can be hidden from the Sent tab (controlled by a hidden setting).
- The Sent Campaigns list displays the email subject, not the template name.
- Deleted or inactive locations will not appear in Reply-To options.
- Special characters are supported in campaign fields (e.g., names, subject lines).
Contents:
Additional Behavior & Notes
Campaign Status Indicators:
- In Marketing > Campaigns > Sent, campaign statuses are color-coded:
- Orange: Campaign is still in progress
- Red: Campaign completed with one or more failed deliveries
- Green: Campaign delivered successfully with no failures
- Campaign Naming:
- The Sent Campaigns list displays the email subject, not the template name.
- This helps identify campaigns more easily based on their actual message content.
- Deleted or inactive locations are automatically removed from:
- The Reply-To Email dropdown
- The location selection list in campaign filters
- Editor Formatting: The marketing editor preserves line breaks and spacing when pasting content from external sources, reducing the need for manual formatting.
- Franchise Behavior: Reply-To Email & Address Logic
- For franchise businesses with client sharing enabled, the system ensures that the reply-to email and physical address used in a campaign come from a location within the same child account sending the campaign. The system determines the appropriate location using the following logic:
- Client’s Preferred Location (Different Child Account):
- If the client’s preferred location belongs to a different child account than the one sending the campaign, it will not be used. Instead, the system selects a location within the sending child account.
- Client’s Last Appointment Within the Sending Child Account:
- If the client’s most recent appointment was at a location within the child account sending the campaign, that location’s details will be used.
- Client’s Last Appointment Outside the Sending Child Account:
- If the client’s most recent appointment was at a location outside the sending child account, the system will select one of the client’s associated locations within the sending child account.
- Single Location Selected During Campaign Creation:
- If only one location is selected during campaign setup, that location will always be used—regardless of the client’s preferred location or appointment
Send an Email Campaign
- Navigate to Marketing > Campaigns
- Select the Campaigns tab, then choose Email
- Choose an existing template or create a new one
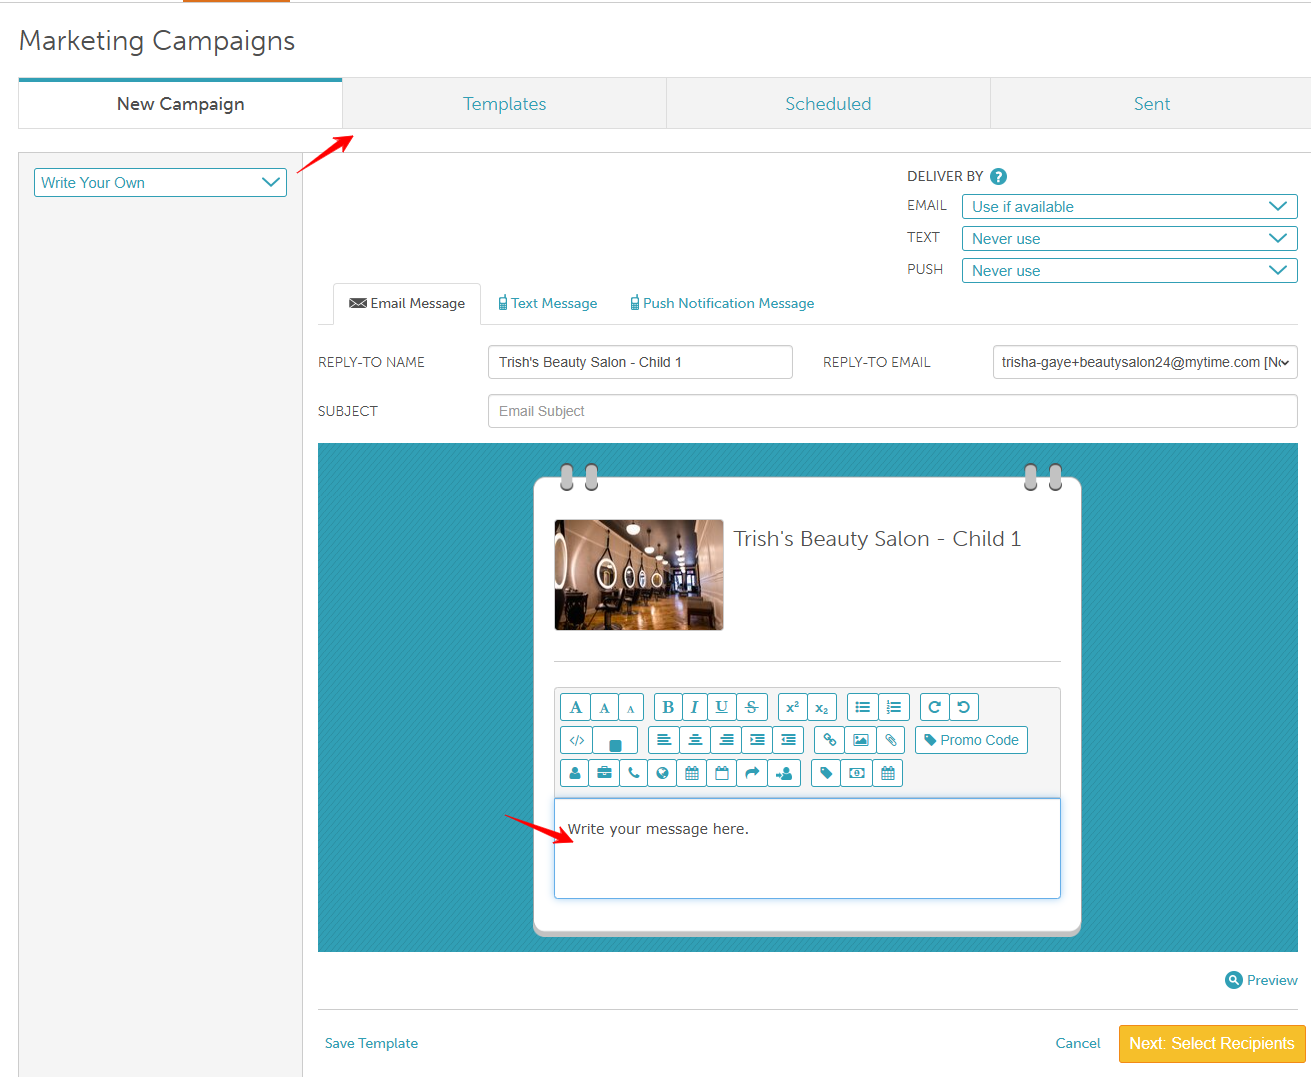
- Configure your campaign:
- Template Name: You can rename the template to one of your preference
- Delivery By (fallback method): Choose a preferred delivery method for campaigns.
- Email Campaigns: By default, the recipient list will automatically display clients:
Who are associated with a location
Have an email address on file and have opted in to receive email marketing campaigns
If a client is not associated with a location, has not opted in to receive email marketing campaigns, or does not have an email address on file, they will not be included in the recipient list.
- Use if Available: The selected method will be the primary method used for delivery
- Never Use: This method will not be used, even if the primary method is unavailable
- Reply-To Name: This is the name that appears when clients reply to an email. By default, it is pulled from the business name set on the Business Profile page.
- Reply-to-Email: By default, this is set to the location's email address.
- If no email is configured for the location, the system will use the location owner's email instead.
- If the hidden setting "Use a specific reply-to email for outbound emails" is enabled, the system will use the email address entered in the "Reply-To Email for Outbound Emails" field.
- Subject: The subject line of the email as it will appear in the client’s inbox.
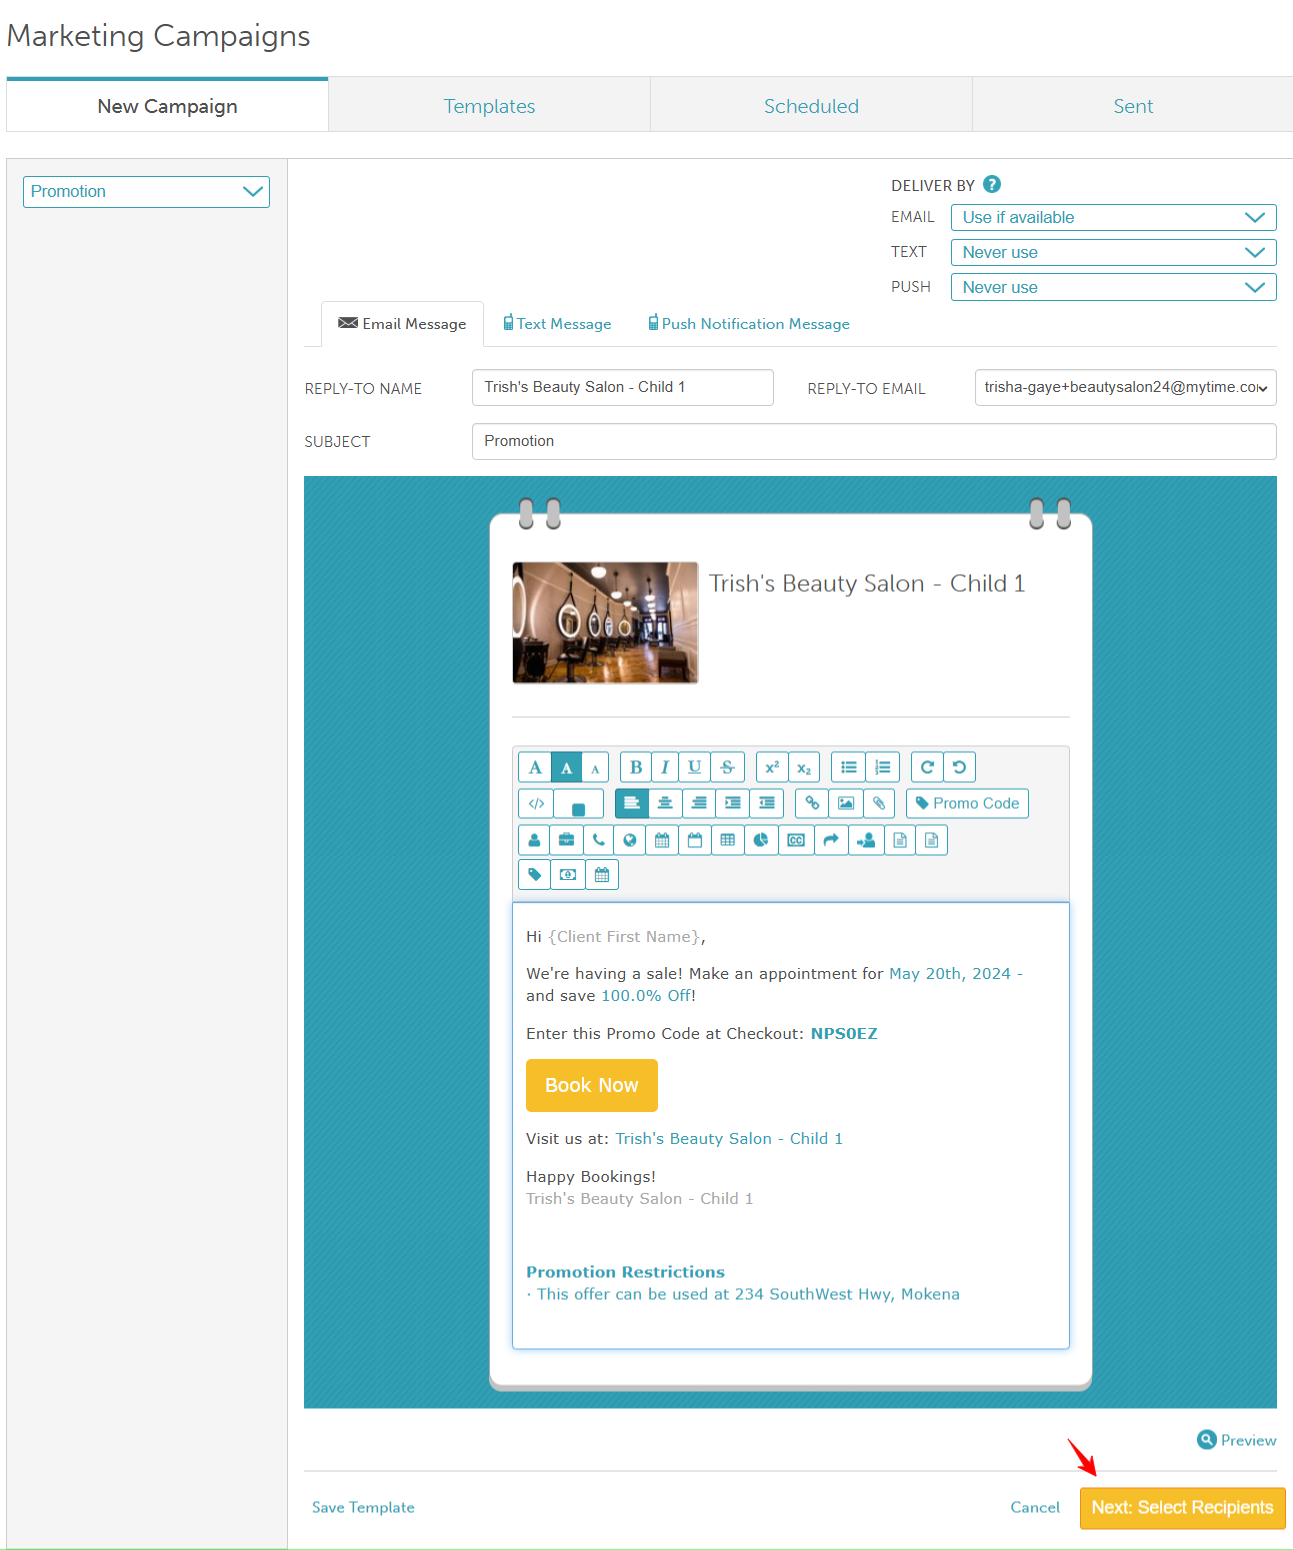
- Email Body: This is the content of the email that will be sent to your clients. You can customize the message, include dynamic fields, and apply styling as needed.
- Click Next: Select Recipients
- Apply filters or search for clients. Learn more here.
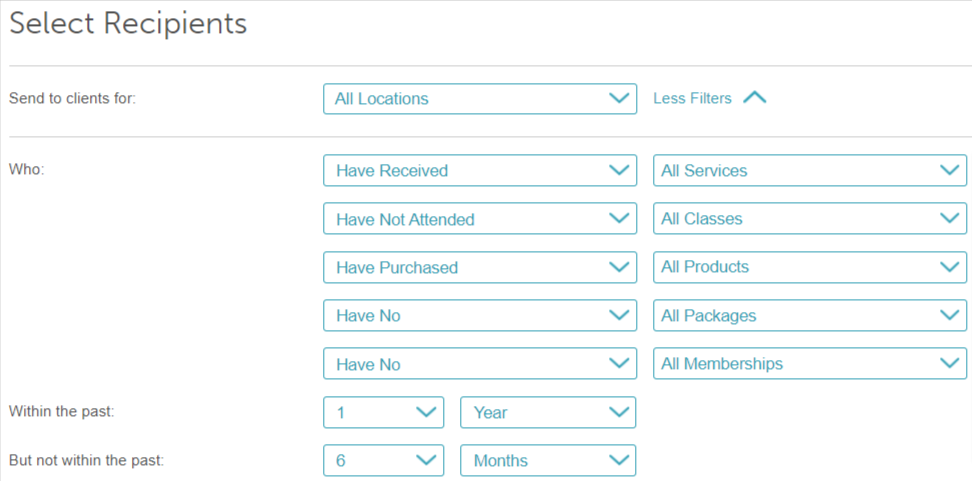
- (Optional) Click View next to the client count to review recipients
- Choose when to send:
- Send immediately, or
- Schedule for later

- Click Send
Viewing Sent Campaigns / Statuses
- Navigate to Marketing > Campaigns > Sent
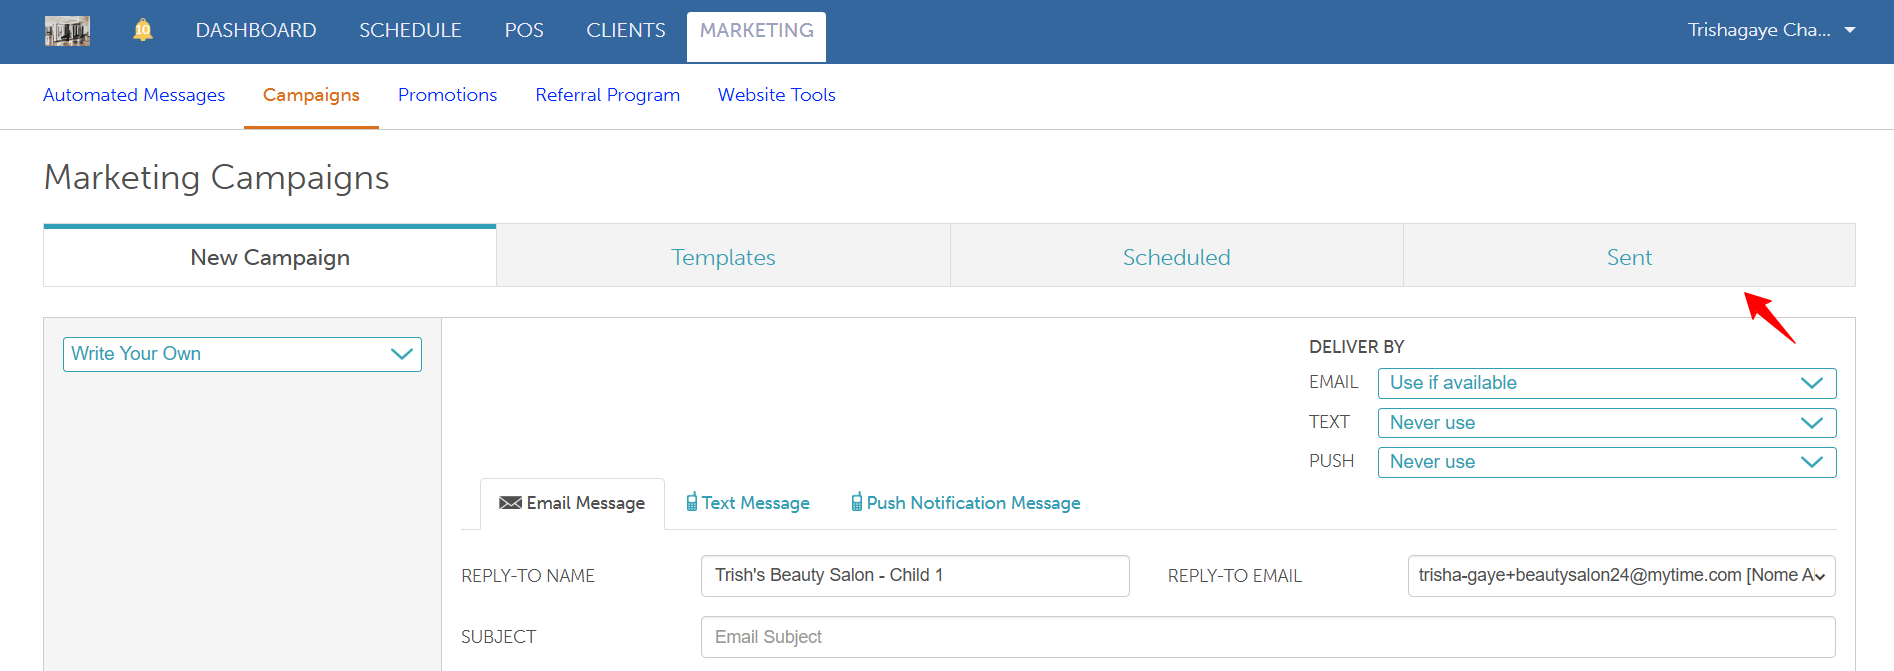
- View campaign performance and delivery statuses
Was this article helpful?
That’s Great!
Thank you for your feedback
Sorry! We couldn't be helpful
Thank you for your feedback
Feedback sent
We appreciate your effort and will try to fix the article